Showing posts with label Dawson Printshop. Show all posts

Tuesday, October 17, 2023

Mind Your Ps and Qs

Mind Your Ps and Qs was a recent exhibit held at NSCAD's Port Loggia and Treaty Space galleries in Halifax, NS. This exhibit was a celebration of the Dawson Printshop and Bindery and all the amazing work that has been created by folks who have studied and worked there over its many years as a focal point of book arts education in this city.

Mind Your Ps and Qs
As a Dawson alumnus I was thrilled to have a couple of my own books included in the exhibit alongside the 15 other artists. The scope of work included traditional bookbinding, artist's books, letterpress printing, printmaking, and tool making. The photos above provide a glimpse of some of the other work in the show by (top L-R) Charles Salmon, Em Doucette, Joe Landry, Odyssean Press, (bottom L-R) Robin Wolfe, Katherine Victoria Taylor, Em Tremblay, and Nat:Shaw.

Congratulations to the Dawson Printshop and Bindery for its enduring influence on the local book arts community and to Odyssean Press and others who helped to make the exhibit a success. An extensive review of the exhibit has been posted on the Nova Scotia Book Arts Group blog.

Sunday, November 07, 2010

Woodblock Letterpress printing - 4

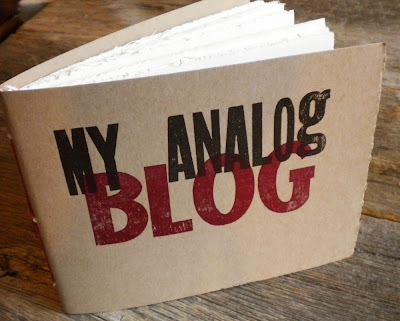
Our final woodblock letterpress class at the Dawson Printshop was a couple weeks ago and I never finished my blog posts to show the final results! Better late than never. I was using the Kelsey parlor press to make notebook covers. I printed them in two colours, first "My Analog" in dark brown then "Blog" in dark red. Another night, I was waiting to use the proof press and passed the time by using the parlor press again, printing a few more notebook covers that have a silver "ME" on them. I really like this font. The final project that I did in class was assembling and printing this collage of many woodblock fonts. It is just a jumble, don't try to make it say anything clever, it is just letters A to Z and numbers 1 to 9 and a few punctuation blocks, arranged on the bed and printed all in one colour. I might use these as decorative papers in bookbinding; that's the plan right now, although I haven't done anything with them yet. Thanks Niko, for a great introduction to letterpress!

Wednesday, October 13, 2010

Woodblock Letterpress printing - 3

Someone mentioned that I never showed a picture of those Christmas cards after printing the second colour. "Merry" was printed first in black, then "Christmas" was printed on top in silver. So here's how they turned out - some were printed on red and some on white...obviously.


After those were done, I started another project using a different kind of press. Here is one of the Dawson Printshop's parlor presses, all inked up with red right now.


This is a Kelsey parlour press; it is a table top press and it is entirely manual. Using this was much different than the comparably gigantic proof press that I was using before. Niko was explaining to me that these small parlor presses were really common in Victorian times when printing was a popular hobby and people just wanted to have one in their home, and of course they kept it in the parlor. So I used this press to print a cover for a notebook. I printed the second colour on them last night so now they are just drying and I'll make them into notebooks and show off a finished one here soon. We have one class left - I've already started something to keep me busy during those last three hours.

Wednesday, September 29, 2010

Woodblock Letterpress printing - 3

During our third class I was able to print the second colour on the cards that I started last week. Here's one of the cards coming around on the print roller, with the silver text now printed on top of the black.


I also got some pictures of the bookbinding gear that lives at the Dawson Printshop. You know you want a paper cutter like this one. It can cut through anything - paper, book board, arms...


More gear, presses, hot stamping machine, finishing press... imagine having such equipment at your disposal!


Wednesday, September 22, 2010

Woodblock Letterpress printing - 2

Last night I went to my second class of woodblock letterpress printing at the Dawson Printshop. The first project is a simple greeting card and last night I was able to print the first colour on mine. We were using a Vandercook Universal 1 proof press.


Definitely a big part of the fun is looking through the drawers of type, selecting fonts and designing the layout and all that. So, here is the wooden type that I picked out and arranged, set on the bed of the printer and ready to go. ("Bed"? Is that the right word? Still not overly confident with the lingo!) I do like how the extra wooden blocks for spacing are called furniture. (So maybe it is a bed.)


I was the first one to start printing so Niko was using my session as a demo for the class so she is here helping me get started.


In the end, I have the first colour down on the cards. Here are a couple of the test prints -


Another member of the class was taking lots of pictures for me, thanks Radhika!

Saturday, September 18, 2010

Woodblock Letterpress printing - 1

Earlier this week, I started a woodblock letterpress class at NSCAD. So for the next six weeks, I'll be playing with wood type. NSCAD is now the home of the Dawson Printshop which used to be at Dalhousie University when I was studying there. So even though it is a new location, it's still familiar. The Dawson Printshop has, literally, tons and tons and tons of equipment and type, both metal and wood. Several antique presses and dozens of huge of cabinets full of type. The instructor is Niko, of White Raven Arts, a fellow member of BEST and an experienced letterpress printer and Dawson Printshop maven. Rows and rows and rooms full of cabinets of type...

Saturday, January 17, 2009

Some boxes

One of the courses I took at the Dawson Print Shop was a full term of boxes and portfolios and I did many boxes in many forms... a lot of small decorative boxes that were never photographed. But when I was sorting my digital photos, I found some that actually were photographed and decided to share them here as well. A couple of "magic boxes". The cover can be lifted from both sides, revealing either one or two of the three interior compartments: A drop back box, custom made for housing a set of journals: And a couple of Japanese boxes. I skipped a step when I was making this red box, and had to fashion an inferior closure as a result. But it works for storing my thread. The blue and gold box is one that I made by request for someone who wanted it for a collection of wrist watches. I've been uploading some of these older photos to Flickr as well. You can see these and a few other boxes in the "box making" set. I've also added several photos of leather journals and other early work like the things from my last blog post here. And by "early work" I mean, well, anywhere from 2 to 6 years ago. I took a lot of photos but I rarely dated the photos or the books so often I'm unsure exactly when something was done... I am trying to be better about that now... Trying to get better photos now too, some of these older photos are terrible!

Sunday, April 27, 2008

The Dawson Print Shop

The first bookbinding course that I took, was at the Dawson Printshop. At that time, it was located in the Killam Library at Dalhousie University. There was a bindery room set up for classes, but primarily it was full of antique printing equipment with over 1000 cases of wood and metal type.


I was reminded of my time at the Dawson Print Shop recently becuase I am running low on hard drive space. I suppose I should explain that a bit better.

While I was at Dalhousie and taking bookbinding classes at night, I was more officially a student at the School of Information Management. One of the projects I worked on as a graduate research assistant, was the History of the Book in Canada project. Specifically, I was the computer nerd making the databases work for the HBIC Electronic Resources component of the project. (And just having visited the website, it appears the database search interface isn't working...is it possible that Lasso is not compatible with new browsers? what a shock!) So, anything computer-related or website-related was handed to me. During the development of the project website, I was given a key to the Dawson Printshop and sent off to take photographs of the equipment so that we might use them on the website. So, I was alone in the print shop with a camera, poking around taking pictures!

This is a replica of a 17th century Plantin-Moretus common press.


So recently when my C drive complained about being low on free space, I went through some old folders looking for stuff I could delete since I tend to save everything. One of the things I found, was a folder containing some of the photographs that I took that afternoon.


The Dawson Printshop has been moved to the Nova Scotia College of Art and Design. I have been to visit since the move and the new space is much more vibrant compared to the no-window zone of the Killam Library. I discovered some photos of the new Dawson Room, on Nik's blog, who has been fortunate to work and study there.

Saturday, October 20, 2007

CSB Solo


Finally I've made a couple of the Crossed Structure Binding Solo books. I couldn't use leather for these since the covers need to be folded double - and the kind of leather I use won't work well like that. So these books have handmade paper for the covers.

I first did the CSB Solo in 2004 in a class with Susan Mills at the Dawson Print Shop. These two books are made using my notes from that class. I compared this to Arregui's CSB Solo instructions and there are some differences so I will have to do another session on the CSB Solo and actually follow her instructions next time.

The main difference between the CSB Solo and all the other CSBs is that the cover is made with one long piece of paper (or vellum or whatever you're using) and the front and back covers are never cut apart. The sewing strips are cut from one end and stuck though where the spine will be - then the text block is sewn onto the strips.


Then the other cover is folded into place and all the strips are waving around at the back.


At that point, the strips are crossed over the spine then stuck through little slits in the front and back covers. I like these little books with the handmade paper covers. I spend so much time working with leather that it is fun to get away from it occassionally. And now that I've looked back at Arregui's instructions I do want to try this again to see how it differs.

Tuesday, October 16, 2007

Dictionary Day

all my dictionariesToday is Noah Webster's birthday so it's recognized, mainly in the USA, as Dictionary Day. Webster being the one who Americanized the British dictionary for the masses. And my old Websters is definiely my favorite dictionary although the Canadian Oxford ranks high on my list as well.

I was going to just mention Dictionary Day and post that little photo of all my dictionaries but as I was gathering them I found my Harvard Concise Dictionary of Music and decided it might deserve some mention today.

This was originally a perfect bound paperback that I got, um, maybe 15-20 years ago (gulp!) and the spine dried and cracked and came apart after a few years. So when I had a chance to learn how to turn a perfect-bound paperback into a sewn hardcover, I selected this dictionary. It certainly turned out well. It never looked as good when it was new.

That was the first time I rebound a perfect bound paperback. I have done a couple more since then, but this one is the best because I did it in a class so I had my instructor, Joe Landry, there helping and all the best tools on hand in the Dawson Printshop and Bindery - including the ability to make that gold printed spine label.

So the loose pages were gathered into sections, about 15 pages each. Then I punched a row of holes very close to the edge of each section - and it is a lot of holes, one every 15 millimeters or so. Then all the sections were sewn onto tapes, kinda looping over the edge of each section. I tried to get a photo here that shows all the little sewing holes.

So the sewing was tedious but once the textblock was sewn together like this, casing it in was standard procedure. I thought the book would not open very well being sewn like this, but it does open really well - not perfectly flat, but it is quite good especially for a dictionary that isn't being read cover to cover. And, as an aside, I really love this marbled paper.