Showing posts with label pink. Show all posts

Monday, November 24, 2025

Rubow Binding

I really like making books using the Rubow binding technique, which is one of the various types of millimeter binding that came out of Denmark in the mid-20th century. They were traditionally made with paste papers on the cover. I intended to use paste paper on this book, but as sometimes happens, when I first made the cover for this book the size wasn't quite right. So, I had to start over and make a new cover and didn't have any more paste paper that worked well with the purple leather and the purple edge painting that I did on the head and tail. So I used some of my marbled paper instead and it turned out quite nice anyway!


Friday, March 11, 2016

Book #348

Group Gathered Lap-group

Today's book completes the set of four of different flat support stitching techniques that I learned from Bookbinding for Book Artists. This one looks nice as an exposed binding with the stitches gathered in groups of three.

Thursday, December 17, 2015

Book #288

Double raised cords with packed cord change-over

This binding does not have a very concise name; the name is more like a short description. Sewing on double raised cords originated a long time ago, certainly as early as the 14th Century, I beleive, maybe earlier? It would have been a covered spine, though. Here I have tried to make it a bit more decorative and used it as an exposed spine binding using leather thongs. I incorporated single packed cords at the head and tail as change-over stations.

Saturday, September 19, 2015

Book #262

Paper Twist binding

This is another Chinese binding today, a paper twist binding or chih-nien. This paper twist binding was usually used as a temporary binding; however, some of these temporary bindings did remain in this state permanently.

Sunday, June 14, 2015

Book #165

Braided Handle 1
The stitching used to bind this book is braided along the spine. This is another of the 3-section sewings that Keith Smith has devised.

Wednesday, May 13, 2015

Wednesday, April 29, 2015

Book #119

Yamato Toji

This is the more formal Yamato binding meant for larger books. This is one of my favorite Japanese bindings; the knotted paper strips and long corner pieces are an elegant combination.

Sunday, April 19, 2015

Book #109

Lightning Bolt

This is another one that I really like. Smith calls this two-section stitching pattern lightning bolt.

Wednesday, April 08, 2015

Book #98

Parallel Bars

Today's little notebook is a simple two-section stitching technique that Keith Smith calls "parallel bars."

Saturday, March 21, 2015

Book #80

Water Lily Book

This little book is made using three origami water lilies with a hardcover. Bound & Lettered (Vol. 5 No. 1) has instructions for making this little book.

Friday, February 13, 2015

Book #44

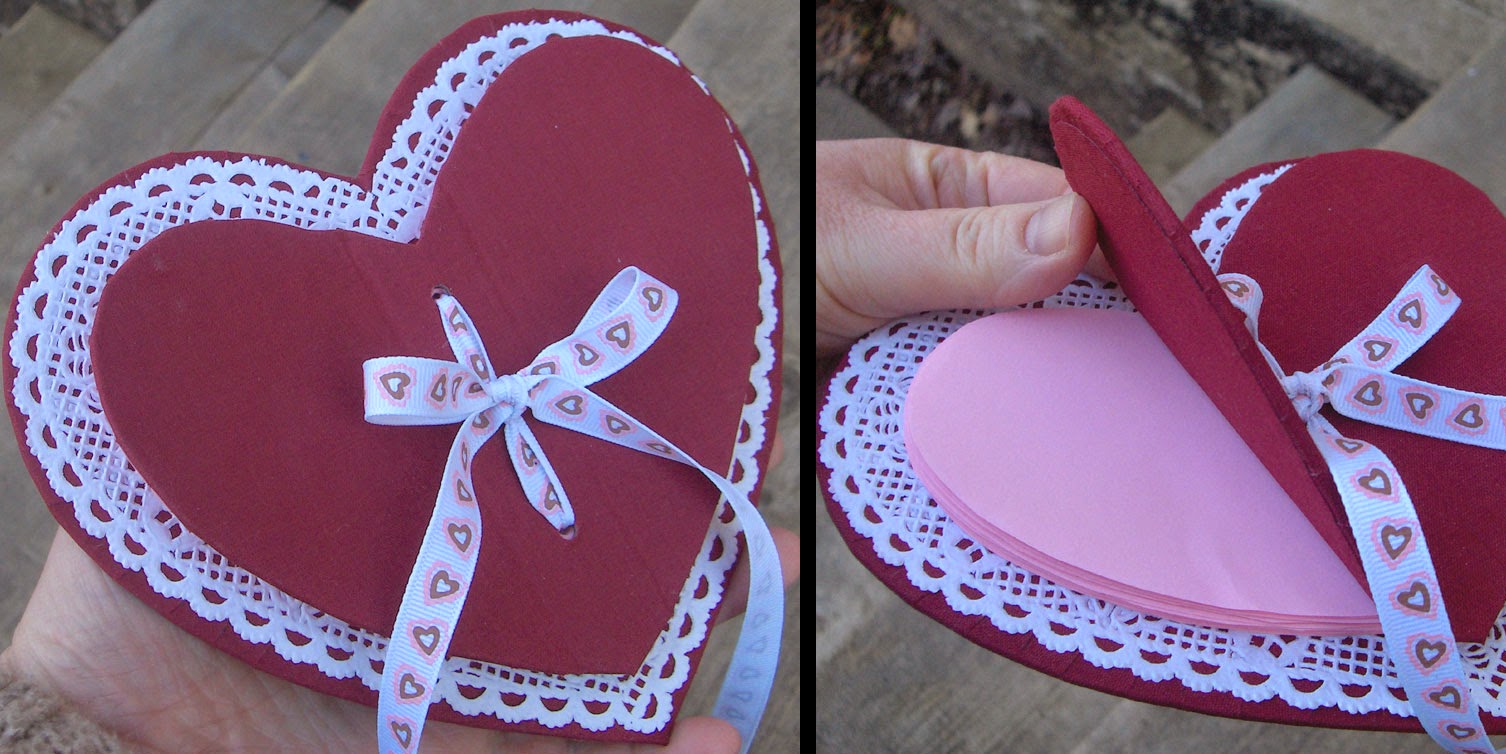
Side-by-each Heart book

I made this heart-shaped book several years ago for a book swap. I often dust off the photos around this time of year. As you can see, it is bound down the middle with the cover opening on both sides. So there are really two books, side-by-side. I don't know if binding a set of pages down the middle to create two books like this has a special name - I have not seen any other examples of it, actually. If any passing readers know of a name for such a thing, please leave me a comment!

Thursday, February 05, 2015

Book #36

Kochōsō Binding

Today's book is made using a Japanese kochōsō binding, also known as the butterfly binding. The cover is made using a sheet of my own Suminagashi marbling.

Saturday, January 03, 2015

Book #3

Chain Stitch with Coptic Endbands
This is an example of a multi-needle chain stitch sewing, which I finished with Coptic-style endbands.

Saturday, February 14, 2009

Origami Hearts and a Valentine's Day Sale

Happy Valentine's Day! I found some online instructions for Origami hearts and made a few with some of my pink Suminagashi papers. The Origami Club has several Valentine projects including these winged hearts shown here as well as some little gift boxes and heart-shaped pockets and ornaments. I also found this video showing how to fold a double heart shape that is cute. Lots of last minute Valentine cards and gift box ideas if you need them!

And - the red and pink books in my Etsy shop are 25% off today only, just for Valentine's Day.

Sunday, December 21, 2008

A Pink Sale

Maybe it isn't the most festive promotion, but I am having a little PINK sale in my Etsy shop, nonetheless. So if you like pink ink you should get a Yink, I think...er, I mean, if you like pink books, you could get one at a 30% discount. I'll continue the sale until the end of December, or until I have no pink things left!

I realize my Etsy shop is suffering a bit, showing symptoms of near starvation, in fact. But I am working on some new items and will be infusing new life therein very soon.

Sunday, September 28, 2008

Practicing Coptic Endbands

I've only tried this a few times so recently I decided to practice. I didn't photograph the first practice attempts! But I got a few books done with decent results. Although I'm not sure that I do it correctly, this is how it looks: And since I was in chain stitch mode, I made some itty bitty books too, but without the endbands:

Thursday, June 19, 2008

I should get a Yink, I think

This one, I think, is called a Yink.
He likes to wink, he likes to drink.

He likes to drink, and drink, and drink.
The thing he likes to drink is ink.
The ink he likes to drink is pink.
He likes to wink and drink pink ink.

SO... if you have a lot of ink,
then you should get a Yink, I think.
- Dr. Suess


So I utilized my newly acquired printmaking skills to do some more carving and printing. So I printed some gold flowers on the covers of these pink chopstick notebooks.

I'm still learning here. I noticed that my Speedball inks dry a lot faster than the Daniel Smith inks. My prints made with Daniel Smith ink seem to be smoother, though. The prints I made using the speedball inks seem to have a grainy texture. Maybe it's just the difference with paper absorbency. Or is there a hierarchy in the world of printing inks? Which is better? Or is it all just personal preference in these situations?

Sunday, January 13, 2008

Books with Pink Paper


Fifteen leather books with pink pages, made by request. Five covers are dark brown, five are a dark raspberry pink, and five are light pink suede. Aren't they pretty?

Sunday, September 02, 2007

Mini Journals

I make little bitty journals sometimes. Another way to use small pieces of leather that are too small for an average sized journal, but too big to be tossed. Or sometimes I do these to use up small batches of paper. I am more likely to experiment a bit with these mini books since they are quick and easy to work with. For no particular reason, I have done several of these recently, resulting in this little pile o' minis. Most are longstitch sewings, and there is one little red crossed structure in there too. The dimensions are between 3 and 4 inches along the spine.

Sunday, August 26, 2007

Bookbinding 101 - Water Lily Book Tutorial

I prepared a guest tutorial for the Sixth&Elm blog, showing how to make an Origami water lily. Now I have a new tutorial ready showing how to make a book using those water lilies.

Before starting this tutorial, you need to make three water lilies, all the same size, using the "Origami Water Lily Tutorial" first. You'll need some Origami paper to make the water lilies, or any other nice lightweight Japanese paper like the pretty pink paper used in this tutorial. So, go make 3 water lilies, then come back.

A single water lily:


When the three water lilies are finished, attach them to each other, back-to-back. Place one flattened lily in front of you. Apply paste to the flat surface of the lily and stack the second flattened lily on top – make sure to align them so the lilies both open at the same end. Apply glue to the surface of the second lily and stack the third lily on top. When they are all attached, they should open up like the first picture below.

The point where the three lilies meet is the spine of the book. To give it some stability, cut a short and narrow strip of paper and paste it over the spine. Use paper that is the same as the liles or similar in colour to keep it unobtrusive.

Click for larger photos.


Now the text block is finished and the covers can be made.

Cut two covers, the same size and shape as the flattened text block. Use binder's board or heavy cardstock. Also cut two pieces of decorative paper for covering the binder's board. These pieces of paper should be the same shape as the binder's board, but about 10mm wider all the way around. Cover both boards as you would for any other book. If you've never done such a thing before, follow the next few steps.

Once you have the decorative papers cut out, brush paste over the entire surface of the binder's board.


Lay the binder's board paste-side-down onto the back of the decorative paper. The edges of the decorative paper need to be turned in to cover the sides of the board, so start with the two longest edges. Bush paste onto the paper on each side then fold it over the edges.


Cut notches in the paper at each corner. Apply paste to the paper and then fold it over. Cutting the notches first will help the paper lie flat and make neat corners.


When both covers are done, it's a good idea to press them under a weight for a while, perhaps over night, to let the paste dry.

Now the lily-textblock just has to be attached to the covers. Place the flattened lily-textblock in front of you, and brush paste onto the flat surface – don't get any glue on the other parts of the lilies because you don't want them to get stuck together. Place the paste-side of the lilies onto the back of one of the covers. Then brush paste over the other side of the lily-textblock and stack the second cover on top.


That's it, it's done.

The whole thing should be pressed under a weight until the paste is dry. This will do two things: it will consolidate the bond between each of the pasted surfaces and it will prevent the covers from warping.

The water lily book in its plain ordinary closed state:


The water lily book in its fun flourishing open state:


When I first prepared this tutorial, I had completely forgotten where I'd originally seen the idea for this book. I came across it this morning so I wanted to add it here. It was an article by Viva Lloyd in Bound & Lettered. Thanks :-)