So, rubber stamps weren't the only thing we did in our printmaking course. Oh no, not at all. In fact, we covered so many things, I could barely take notes fast enough. The scope of the course included: lino prints, reduction printing, dark field monotype printing, trace-style monotypes, pressure prints, painted monotypes, a bit of colophon printing, and of course, screen printing. Then we covered some fun folding book structures at the end, which is a great way to visualize the process in the realm of book arts. This first picture shows Matt demonstrating the silk screen printing process.
The greatest bonus with silk screen printing is the ability to create many many many prints - once the screen is prepared, making the actual prints is slick and quick. As a class, we created a screen for printing some two-sided origami paper. I think there were a million prints made...or maybe about 50...something like that. Everyone was able to take a few sheets anyway. Matt showed us how to use a dark room and light table for exposing the screens, and then also showed us how to do it just by exposing the screen in direct sunlight for a couple minutes. So it can be done without too much special gear...that's nice to know. Although I don't think I'll take up screen printing.
I tried reduction printing, and stencil printing, and a couple monotype prints. But I found that I was most drawn to creating printing blocks with linoleum. I decided to create a few related images, resulting in these "Reminders of my Grandfather."
During the course, I created about half a dozen of these lino cuts. The last photo shows some of the linoleum blocks with the prints. We had access to a couple printing presses, but we also printed by hand without a press. The beauty of this being, that I can print them again...! Seems like a really basic concept, but it actually took a couple days before I understood this fully. I've already been to the art store to buy some ink and a brayer and more linoleum... I'm looking forward to using some of these new things in my books.
Friday, May 30, 2008
Tuesday, May 27, 2008
Printmaking, the beginning
The last half of my PBI session was about printmaking. The instructor was Matt Liddle and he spent a lot of time the first couple days demonstrating a million different techniques and showing us samples and all that good stuff. Here he is, showing us one of his pieces, which is a reduction wood cut. He has the final wood block there as well as one of the finished prints.
I had never done anything like this before and was a bit concerned about that lack of experience as I think all the other people in the class had at least a bit of exposure to it. But of course, there was nothing to be concerned about! We started by making some rubber stamps - Matt does some amazing things with his rubber stamps, creating extensive and detailed landscapes and graphic stories, often in book format. My stamps were really simple, but it was a great way to get quick results on my first day of printmaking class!
And apparently printers used to make themselves hats from a sheet of newspaper...so we made ourselves some printer's hats and stamped them using our new rubber stamps. Mine is on the left, the right shows a few of the other paper hat designs and stamps made by others in the class.
And, AshvilleBookGirl was in my printmaking class too! It was great to meet you Clara, and so glad we had a class together!
Thursday, May 22, 2008
The Mexican Inquisition at PBI
As mentioned in an earlier post, one of the classes that I'm taking here at PBI is about the Mexican Inquisition Trial Documents. Gillian Boal was the instructor for this. She has been working to preserve these documents and has examined them quite closely to see how they are made. We started by making a simple paper version, then we made quite a large and thick document and covered it in leather, trying to replicate the book structure as much as possible. The problem being, the original documents are not all done exactly the same way; there are a lot of variations among them and only a couple have leather covers still intact. The leather book we made was modeled after one of the bigger documents she has examined.
The pages within the textblock are all creased into quarters then flattened out again. This was done to create margins on the sheets. During the trials, they would write on part of the page, then later add notes along the side. The primary sewing used a paper "stub" (Gillian was trying to come up with a name for this piece, but I'm not sure if she settled on anything...devil's backbone was one suggestion). Then there was a secondary sewing through another wrapper and onto leather thongs. Here my text block is lying on top of a photograph of the original document.
These trial documents were a compilation of notes from trials, as well as various pieces of evidence used for the convictions. This included letters from witnesses and other objects used to prove someone's guilt. The accused were usually being convicted of acts against the Catholic church, such as practicing Judaism or other non-Catholic worship, witchcraft, as well as women who were suspected of improper behavior on Friday evenings (or any evening, I suppose)! So the trial documents include some little tiny notebooks like spellbooks, that were collected as evidence. Also, leather pouches like talismans, and even a hangman's noose is bound into one of the books when the accused was found dead in his cell after hanging himself. The book I made includes a noose that I tied myself, and I made a leather pouch, as well as a couple little notebooks and letters, etc.
This next photo is one of the original leather pouches that was attached to a trial document. The contents are a small bone, a bit of white powder (unidentified), and a little written letter, each all folded neatly in bits of paper. (I also have these things in the pouch I made - Gillian provided some sort of little bone, and we put in a bit of cornstarch for the power, along with a little letter.) Gillian has taken the original pouches and put them into conservation boxes so that they can't be handled. The contents of this pouch have been photographed, but now it is permanently sealed inside this box and can't be removed. There is a second pouch that has never been opened.
So we also learned how to make this type of conservation box. It is a quick and practical box structure that can be put together without much difficulty. I didn't put my leather pouch into the box that I made. But I did make one of these boxes and put something special in it. The following photo shows all the books made by the people taking this class, along with all the little conservation boxes we made. My book is the one lying in the foreground with my blue conservation box lying just on the corner of it.
Now for the remainder of PBI, I'll be learning printmaking...boldly going where I've never gone before...
Monday, May 19, 2008
Suminagashi
Aside from the traditional marbling that I did with Nancy Morains, I also learned Suminagashi, which is a very old Japanese technique of paper decoration. This involves special suminagashi paint and a sumifactant from Japan that you apply using sumi brushes.
The brushes are dipped lightly into the water to create patterns. Colours are alternted to create rings and the sumifactant can be used as an 'invisible' colour if you want the colour of the paper to show.
When the surface of the water is sufficiently covered with colour, it can be fanned or blown lightly to move the colours creating different patterns.
Although the basic concept is similar to the other marbling I was doing, the process and intent is quite different. I didn't spend as much time with this, but still produced several interesting sheets of paper. The one shown above being my favorite.
Sunday, May 18, 2008
Marbling Finale
Saturday, May 17, 2008
Another day at PBI
Actually, I made a discovery on Day 2 at PBI. Arrowmont College has a great little reference library here with a good selection of texts on book and paper arts, which is fantastic. So I have spent some of my "free time" in there looking through books and taking notes and all that fun stuff. The best part, though, is the honest-to-goodness, just-like-old-times, wooden card catalog that they are using. It's nice to use a card catalog since they have disappeared in so many other libraries.
And here is my first attempt at the traditional Bouquet marble pattern:
Kinda wonky. There will be more attempts at this one, it's such a great pattern when it looks good. We've also done some french curl patterns, non peris (sp?) spanish waves, and some expirimenting with the addition of soap and turpentine, getting great effects. I will be back at it again tomorrow.
Thursday, May 15, 2008
PBI - Day 1
Intensive is a key word in Paper and Book Intensive. We dropped in here, running full speed, it seems. My first seesion was paper marbling with Nancy Morains (Colophon Book Art Supply). I had no previous experience doing this, but now I've marbled eight sheets of paper, rock patterns and spanish wave. Here I am, splattering colours onto the goo:
That was one of my first attempts and wasn't very confident about what I was doing. We did a few single colour sheets, then when it seemed like we knew what to do, she let us use several colours. We will be continuing with the marbling, doing other techniques and patterns over the next few days. This is one of my 3-colour rock patterns, I think this is the last sheet I made:
I have lots of other photos, I'll show some of the other things we did, making the whisks and such, another time. Overall, super fun way to spend the morning!
This afternoon I had my first class with Gillian Boal, about the Mexican Inquisition trial documets. The history of these documents is quite fascinating. They would collect evidence to convict people and bound all the pieces of evidence (letters, notebooks, leather talisman pouches, etc) all directly into the documents. Today we made a basic model of the structure and started making a few little spell books to include as evidence in a larger project that we'll work on over the next few days.
It's dinner time now so I'm off for a break, phew! Great food, by the way. But the evenings are full too, with various presentations by some of the instructors and staff, so it never stops around here.
Tuesday, May 13, 2008
"The time has come," the Walrus said,
"To talk of many things:
Of needles--and threads--and cutting mats--
Of linoleum--and inks--
And why the boards are warping so--
And if the papers will shrink."
With apologies to Lewis Carroll.
Actually, the time has come for me to pack my bags and leave for Arrowmont!
I am going to Paper and Book Intensive in Gatlinburg, Tennessee. From the 14th to the 25th, I'll be participating in the following courses:
Mexican Inquisition Trial Documents with Gillian Boal
The subject of this course is the leather binding used to assemble manuscript trial records, or processos, created during the Mexican Inquisition.
Introduction to Marbling and Suminagashi with Nancy Morains
This class will provide an introduction to the basic techniques for both paper marbling and the Japanese technique of suminagashi, two methods for applying water-based surface decoration to paper.
Think It/Ink It - Basic Printmaking for Book Artists with Matthew Liddle
This workshop will cover a variety of printmaking techniques that can be used for single prints and bookworks, as well as multiple editions.
I will be sure to document my adventures here on the blog either throughout the course, or soon afterwards, depending on the amount of time I have for such things. I am looking forward to this very much - can hardly believe the time has come. Whooooo. (But I'm leaving my guys behind, I will miss them!! Oh, 12 days seems like such a long time to be away, ack!)
Sunday, May 11, 2008
Happy Mother's Day
I was just preparing a fun little Mother's Day post for the B.E.S.T. blog. I found books/bindings to go with each of the letters in "Mother" so I started by compiling a list of all the bindings and book styles that I could think of, for each of those letters. I could only use a few in that original post, and it was limited to books available from our members so I'm going to put the rest of my lists here, just for fun. Happy Mother's Day to me! Leave comments if you think of some book styles that I've missed.
M
Miniature book
Millimeter binding
Medieval Binding
Monastic / Monk's books
Multi-quire bindings
Matchbook notebooks
MarcoPolo Crossed Structure
O
Octavo
One-signature book
Open-back (Open-spine) book
Otabinding
Origami Books
T
Teabag book
Tacket binding
Tunnel book
Tortoise shell stitch
Thermal Binding
Travel Journal
Thesis Binding
Trade Binding
Three-quarter Binding
Tight Back book
H
Hardcover book
Halfbound book
Herringbone stitch
Hemp leaf stitch
Hollowback book
Hidden Crossed Structure
E
Ethiopian chain stitch
Envelope book
Expander Crossed Structure
Edelpappband
Exposed spine bindings
R
Recycled book
Raised cord sewing
Running stitch
Receipt book binding
Rebound books
Monday, May 05, 2008
Bookbinding 101 - Making Paste Paper
Making paste paper is fun and messy. It is a simple process where you smear coloured paste over a sheet of paper, then make patterns in it using whatever tools you have on hand. I haven't done a lot of it, but I tried it recently and took lots of photos. And now I'm finally getting it up here on my blog.
So the first thing you need to do, is make some paste. You need to make some paste using wheat starch or corn starch, some people use rice starch or even wallpaper paste. For most starch pastes, you will probably want to make it with a ratio of about 1:8 (one part starch to 8 parts water).
Divide the paste into two or three containers, one for each colour that you want to work with. Tint the paste using either acrylic or watercolour paint. I like to use acrylic paint since it is more water-resistant when it's dry. So, add paint and mix it until it is consistently coloured. Inexpensive paint will usually result in colours that are pale so I suggest using the best quality paint you can afford.
Gather a few things to use as pattern-making tools so that you'll have them close when you're ready for them. You could use combs, forks, sticks, bone folder, rubber stamps, sponges, crumbled paper bag, your fingers, or anything that will make a pattern when pressed into the paste.
Dampen the paper before you start - dip it in a tub of plain water, or use a spray bottle to mist the paper. Let it relax then brush your coloured paste over an entire sheet of paper. I am using 80lb drawing paper here, but it can be any paper that has decent wet-strength. I also tend to start with large sheets so that there is lots of room. But you could do small sheets. I spread the paste right to the edges and onto the table to make sure the whole sheet is covered. A bigger brush or sponge will help spread the paste more quickly. Try to get a nice consistent layer of paste on the whole sheet.
Once the paper is covered with paste, grab one of your tools and start making marks in the paste by dragging it over the paper, or pressing it like a stamp, to create whatever sort of design or pattern you like. You can criss cross lines in opposite directions, do zig zags, splotches, curvy lines...etc, whatever you can come up with.
My examples are really simple - but there is an art to this process and a lot of history; the masters produce some amazing pieces.
Of course, I had to show my little boy what I was doing, so here he is at the other end of the table, doing his own paste paper. Although for him, it was really just finger painting.
If you don't like what's happening on your paper, grab the paintbrush and brush it out and start over again! Or try just adding another design over top of the first one, moving in the opposite direction.
When you are finished making the patterns, leave your paper to dry flat. When it's dry, the paper will likely be stiff and maybe curled at the edges. It can be flattened by pressing or you could try a not-too-hot iron. Though, you can also wax and/or burish the papers if you have time, which will make them look really nice and they will be flat and less stiff.
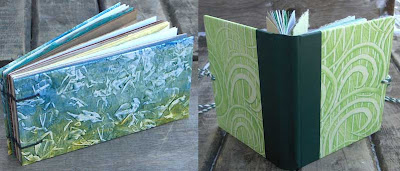
This is what my yellow paper looked like when I was finished - and then later it was used on the covers of this little hardcover book.
More papers...
More books...
So that's how to make paste paper. Basically. If you're really interested in mastering this, there are some books available. But before you go, check out some of these links to see some great examples:
- Madeleine Durham's paste papers
- Paste papers by Sage Reynolds
- Paste papers by Peggy Skycraft
- Historic paste papers
- Paste papers by Threadborne
Saturday, May 03, 2008
A Visitor
I should have photos! But I didn't think to take any photographs today. I had my first studio visitor this afternoon. She is visiting the area and trying to fit in as much book-arts-related stuff as possible. So I was super pleased that she asked if she could come here for a visit. We chatted a lot about the different styles of books that I make and looked at some of the amazing books I have in my little collection from other book artists. We even made a quick tacket binding like the Nag Hammadi books and then played with some of the Crossed Structure binding methods. (It was a lot of fun Shirley, thanks so much for coming!)
Subscribe to:
Posts (Atom)