Tuesday, March 05, 2013

2013 Weekly Planner Giveaway

I have two 2013 Weekly Planners to giveaway! All you have to do is leave a comment here and tell me how much you want it. Or tell me how it will help you get organized for the rest of the year. Just tell me whatever you want to tell me, really. If you want to get extra entries, you can tweet (include @myhandboundbook) or share on your own blog (and leave a link)! Comment here to tell me you've done those things. Be sure that your comments include an email address or something that will allow me to contact you if you win.

So, as I said, I have two planners to giveaway.

First one. This planner is my standard leather weekly planner, with a camel-brown wrap-around cover and a strap. In addition to the standard 2013 calendar pages, there are lots of extra blank pages, a pocket page, and there is a ribbon bookmark too. Value $30.


Second one. This is a simple, slim, purple planner with a cover made from gorgeous St Armand handmade paper. It's a sturdy cover and it has a little pocket built into the back cover where you can store a pen or some business cards or whatever fits in there. The front cover is stamped with my original 2013 rubber stamp. Value $10.


I will accept entries here on my blog, and on my Facebook page, until the end of the day on March 20th. Then I'll number all the entries according to the order they are received, and use a random number generator to pick two winners. The first number drawn will win the brown leather planner. The second number drawn will win the purple planner. I will ship them anywhere in the world. So leave a comment and cross your fingers!

Sunday, February 24, 2013

Book Review: Beautiful Bookbindings

Beautiful Bookbindings: A Thousand Years of the Bookbinder's Art
PJM Marks
The British Library and Oak Knoll Press, 2011

This is, as the title indicates, a collection of beautiful books from a very long tradition of bookbinding. The earliest book included is from the seventh century, and from there the collection continues along an ambitious timeline, finally reaching the early days of the twenty-first century in the last few pages.

The early books displayed in the first chapter, span about ten centuries so the result is a very brief snapshot of a very long period of history (exhibited over a mere 11 pages). The selections from this period are, indeed, beautiful and show primarily those books which fall into the Western tradition of bookbinding. There are some exceptions to this, with an example of a concertina from Korea (14th C) and an Indian pothi (15th C), like a palm-leaf structure.

The early books are my personal favourites, so I would prefer to see more in this chapter. The next five centuries each get their own chapter, starting with the Sixteenth Century and ending with the Twentieth Century. Each of these chapters has about 30 pages, thus permitting a better overall view of each period compared to the first chapter. Of course, there are far more books surviving from these recent centuries so it is understandable that they would be represented here in greater numbers.

Beauty, of course, is in the eye of the beholder and it must have been very difficult to choose which bindings to include in this book; but, I think the selections are very well made and illustrate the various bookbinding traditions (albeit primarily Western traditions) very nicely. It would be even better to see more books from outside the Western tradition, but I do understand that any collection like this must have boundaries and cannot include everything. The collection is mostly codex format bindings in the English and German traditions with a sprinkle of Asian here and little American there. The collection focuses on the cover decorations used by bookbinders, not the actual binding structures. There is lots of tooling and painting and embroidering and inlaying. As it mentions in the text, the artists (i.e. the bookbinders) behind these amazing works of art, are mostly unknown and individual bookbinders were rarely credited.

The photographs in this book are flawless and there are many close-ups showing amazing details of painting and tooling and texture that can be very difficult to convey on smooth glossy paper. Wonderful detail is shown in a photo of a fabric-covered book (p. 53) where the weave of worn velvet can be seen, almost felt, beautifully intact on the face of the cover, slightly frayed in the hinge area by the spine - complete with a little stain here and there - and embellished with ornate clasps and painted metalwork.

Attention is also given to certain details such as clasps and fore-edge decoration. Various books with exceptional fore-edge decoration are examined in almost every chapter. This is a lovely detail to highlight in a book like this and it is fascinating to see it evolve over the centuries. Chapter 3 (Seventeenth Century), has several stunning examples of fore-edge clasps - another lovely detail on which to focus. Most of the examples are metal clasps, but there is also one example of an embroidered binding made for James II, which has fabric ties rather than metal clasps. As the collection moves forward in time, it is delightful to see how all these ornate bindings influence the trade bindings of the nineteenth century. There are several gorgeous examples of trade bindings in this book, mostly from London, showing the very pretty, colourful covers of the popular literature at the time.

I have enjoyed browsing and reading this book and admiring all the fabulous tomes presented therein. The selections in this collection are all beautiful, certainly, and I suspect that this is a good representation of the entire collection available at the British Library. The final chapter on Twentieth Century bindings showcases a few of the best design bindings of the past hundred years, all very traditional in spite of the experimentation that has been happening in the book arts in recent times; however, another hundred years (or so) must pass before someone can choose the bindings that best represent the current century.

Reviewed by Rhonda Miller, Feb 2013.

Friday, February 01, 2013

Last of the 2013 Weekly Planners are now 50% Off

Once February arrives, I figure it's time to let the rest of the Weekly Planners go for half price. So if you were waiting for this moment to come, or if you were just procrastinating about getting yourself a new agenda, then the time is now!

They are half price until they're gone!

Check my shop to see available colours:
www.etsy.com/shop/MyHandboundBooks

Tuesday, January 22, 2013

The little books, repaired

Last month, I mentioned that I had been asked to repair a set of old books, and then I left everyone hanging, wondering what had become of them! Well, I finished them before the holidays, and now I'll finally tell you more about it.

It was a thirteen-volume set of Shakespeare's work, called the Handy Volume Shakespeare. The books were very small, thin paper, etc. As can be gleaned from a little online research, it seems there must have been many, many of these sets produced over a period of a few years around the turn of the century (although this edition was undated so I don't know exactly when it was printed). This particular set must have been very well used since the spines were badly cracked or missing, some band-aid repairs had been done in the past, and the covers were just disintegrating in my hands when I tried to work with them.

The main objective of this project was to make new covers for the books, and make the set functional once again.

As I said, there had been some attempts at repair and I found some of the covers stuck on with cellophane tape (gasp!), and there were a few loose pages that were taped as well.

I even found one page taped, and reinforced, with reinforcements!

It was an interesting adventure to poke through each little book. There were some random surprises, like little notes, a bit of ribbon, some other little inclusions, a bit of marginalia, etc.

After the covers were removed, I cleaned the gunk and old cover material off the spines. I used wheat paste to soften the old glue and cleaned them as well as I could.

As it turns out, the bindings were very much intact and I didn't have to resew any of them (thank goodness). This is how they looked after that messy spine cleaning part was finished.

Before I started working on the new covers, there were a few loose sheets that I had to tip in. A couple of those pages needed to have holes filled, like this one, where I added paper to the corner area before tipping it in.

So, surprisingly (or maybe not), making and attaching the new covers turned out to be the easiest part of this project. We decided to go with brown leather and paper spine labels, in an attempt at keeping their appearance in line with their age - and this is how they looked when I was done:
They were successfully finished and delivered before the holidays to be given to some lucky theatre student as a Christmas present. Hopefully they will be well used for another hundred years.

Additional photos that were taken for this project can be seen in an album on my Facebook page if you're interested: www.facebook.com

Wednesday, January 02, 2013

Happy New Year!

Welcome 2013! I'm really looking forward to this new year. I have lots of bookish plans and ambitions and can't wait to get started.

Just to start things off, you can stop by my Etsy shop for 23% off, just by using the coupon code: HAPPYNEWYEAR when you order. A perfect opportunity to get a great price on your new journal or weekly planner! Visit www.etsy.com/shop/MyHandboundBooks and order before midnight Jan 3rd, to take advantage of this coupon code. Happy New Year everyone!

Monday, December 24, 2012

Merry Christmas!


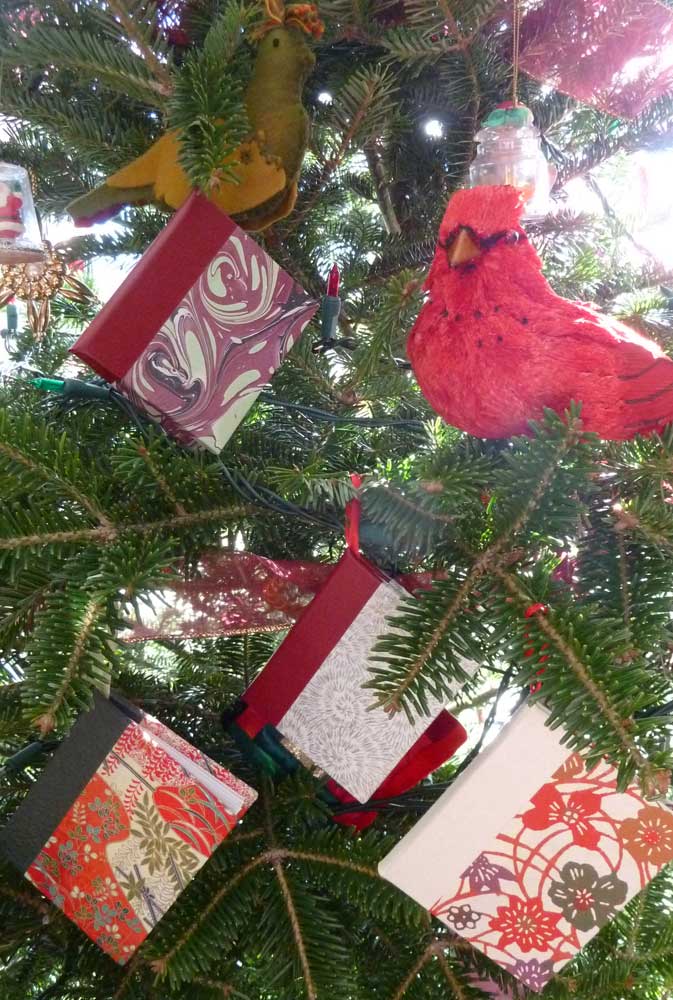
Merry Christmas to all my blog readers! I hope your holiday is filled with books - books in any form. Like previous years, I had a little Christmas bookmaking project recently. This time, I made little books as tree decorations.


The covers have various Japanese papers, and some of my marbled paper. Inside, they each have a few bars of Jingle Bells printed on the pages.


Previous Christmas book projects: 2007, 2008, 2009, 2010, 2011
Merry Christmas!

Thursday, December 13, 2012

Repairing some little books

This is what I started with last week. It's a set of 13 small books. Old, falling apart, dirty, uggh. The project is now well underway. They will have new covers and look fabulous in a few days!

Tuesday, November 27, 2012

Halifax Crafters Market - Dec 1 & 2

I'll be at this market on the weekend. This is a great show for Christmas shopping - always fabulous stuff. I'll be on hand with my work: journals, leather agendas, hand-marbled items, notebooks, photo albums, and more!

Tuesday, November 13, 2012

Marbling demonstration

Just a couple pictures from a marbling demonstration that I did a while ago, for a local historical society. We did this right in the middle of the museum - I was careful to not splatter paint on any of the antiques. I even found a few examples of marbling in their library to show them marbled endpapers and fore-edge marbling on some of their antique ledgers.


Tuesday, October 30, 2012

Happy Halloween!

I didn't have a chance to make any exciting Halloween journals this year, unfortunately. I love making journals with a Halloween theme because there is so much fabulous imagery and folklore associated with the season and Halloween has the best colours of all the holidays!

There are some really cool Halloween books to see over on the BEST blog. In fact, they are looking for votes. So go over there and pick your favorite to win the BEST Zombie Award for 2012: www.bookbindingteam.com.

Tuesday, October 16, 2012

It's just that time of year again

I've been so busy during the last couple months, that I haven't accomplished much at all. Apologies for not having exciting things to share here on my blog lately. First of all, I've started making my weekly planners for 2013, which always keeps me busy this time of year.


Second, it's Fall and holiday craft markets are coming up, starting about a month from now. And last weekend was Thanksgiving and in two weeks, it's Halloween!

Saturday, September 08, 2012

Guest Blogger Mary Patton, Paper Sculpture

Mary Patton is a paper sculptor currently living and working in Chicago. By day she is a Math tutor with AUSL; by night a free-thinking, nose-to-the-grindstone paper making MacGyver. She is in the process of making a website, if you adore her work, email her for sales inquiries. Mary is also a burlesque dancer, gluten-free cookery queen, and all around nice gal. Visit Mary's tumblr page for updates from her. At PBI this year, Mary took a class with Lee Running and Mary has very kindly taken some time to share that class with us here on my blog.

At the intersection of pulp, tradition, and the avant-garde is where you will find Lee Running. At least, this is where I met her at PBI 2012-in the Clute on Oxbow campus, where I became her studio assistant for four days of pulpy bliss.

As a student, Lee was introduced to paper as a medium while working for Dieu Donne in NY. It is considered the gallery for papermakers -- both experimental and traditional. While at Donne, Lee had firsthand experience working with paper in non-traditional ways. After being bitten by the pulp-bug, she read Tim Barrett's book Japanese Papermaking: Traditions, Tools, and Techniques that outline completely the traditional process of hand papermaking in Japan. This book, she says, "changed her life" in such a way that she wanted to "make paper that looked like paper."

So Lee Running set out to the University of Iowa to work with Tim Barrett. The rest is history -- as they say. Since that time, Lee has composed a body of work involving paper as the medium, nature as the message, and currently holds a position teaching sculpture at Grinnell College in Grinnell, Iowa among other appointments. Please consult her website for more more information and to view her beautiful work: leeemmarunning.org.

One of the many things I learned from Lee was that all stages of fiber preparation are to be respected. Dried sheets of flax, cotton, and abaca came to us from Carriage House in New York. These sheets were soaked in buckets of water, measured to two pounds in each bucket and then completely hydrated to soak before going into the beater. After each fiber was beaten to the desired consistency the beater went through a thorough process of cleaning so as not to contaminate the next batch of fiber with the previous.

On the first day of class we met outside at two long tables butted against each other, dotted with buckets, each student quizzically carrying a hard-boiled egg from breakfast. We were to make plaster molds of the positive and negative spaces of the egg for paper casting. From these molds and eggs we would, that day, cast both cotton and abaca fiber sheets. The class learned the finer points of plaster sourcing, the proper consistency of plaster to cast, and mold building. The two most important points being that: A lubricant is very important in release, and plaster over the meridian line of your egg will cause a painful separation of positive and negative.

One of Mary's paper sculptures:


While our two-part molds were drying, Lee taught us the basics of sheet pulling, about molds and deckles, as well as the proper stance so as not to strain your shoulders while standing at the vat. Our first two days were instruction time and test making. By experimenting with restraint drying techniques students were able to see how temperature, and fiber type reacted to horizontal as well as vertical drying.

The abaca fiber was "over beaten", that is to say it was beaten in a fiber beater for 5 hours, and had considerable strength. Upon drying, a flat sheet pinned on three of its corners to the wall would pull out the third corner causing it to stand out by an inch from the wall. By comparison the cotton fiber merely loosed the pin, and had a fluffy texture, as it was not restraint dried flat.

Lee brought along with the fibers, a double boiler and beeswax. With this the class was able to coat its papers and sculptures producing some interesting effects. The paper takes on a luminescence, and weight; appearing less like paper and more as plastic. This is a technique I am excited to incorporate into my own work.

Another paper sculpture by Mary:


Students were able to create exciting new experiments without fear of failure such as Shifu, the twisted paper threads native to Japan; wax dipped papers; pulp cast from wire and fabric molds; sewn, glued, and various cast constructions as well. Fibers were combined such as cotton and abaca to produce texture and tension. Hats, masks, baskets, and sculptural books were all made with joy.

Paper sculptures from various members of the class,
including some of Mary's work.


The effects of the class, for me have been life changing. I am no longer considering an MFA in book arts but one in sculpture; sculpture centered on the merits and potential of paper. Indeed, I am running headlong into a world where paper looks a bit unlike paper and that is just fine by me.

Thursday, August 30, 2012

Leafy paste papers

Just for fun, the next time you're making paste paper, use some leaves! Here's one that I did, pressing a leaf into the paint. I think it turned out great!

I used a small leaf on this paper. I just used the same leaf over and over, until I covered the whole sheet. It was quite a large sheet of paper, this is just one corner of it.


I did another sheet with a large fern too, that also worked well. I know it's been done before, but it was new for me!

Saturday, August 25, 2012

Guest Blogger Sandra Anible, Decorating Handmade Paper

Sandra Anible is a book artist living in Madison, Wisconsin. I met her at PBI in May 2011, when she was a PBI participant and one of the lucky scholarship students who was on hand to help keep PBI running smoothly. Sandra also wrote for my blog about one of the other PBI 2011 classes, making conservation enclosures with Denise Carbone. This time she has written a review of Bridget O'Malley's paper-making class, also from PBI 2011. Thanks for sharing your class experiences with us, Sandra!

At the 2011 Paper Book Intensive, Bridget O'Malley taught a class that featured several creative methods for decorating freshly couched handmade paper. O'Malley is co-partner with Amanda Degener of Cave Paper (www.cavepaper.com) in Minneapolis, Minnesota. She first taught us how to create sheets of handmade paper using both cotton and abaca fibers. After we became comfortable with the Western method of pulling sheets, she provided instruction on how to screen-print pulp onto the handmade paper.

Some of the papers made in this class:


The method entailed painting a piece of stretched polyester fabric using Speedball drawing fluid. After flooding the fabric with Speedball screen filler, the water soluble drawing fluid resisted the non-water soluble screen filler, and the painted image was washed away with water after the screen filler dried. This created a means by which the imagery would be screen-printed onto the newly made paper using a finely beaten, pigmented pulp.

We then used our xacto knives to cut pieces of mylar film in order to create stencils. A mylar stencil could be placed over a freshly couched sheet of paper, and pigmented pulp could be applied over the stencil in order to make creative, editionable papers.

Blocks of Easy Cut were made available, as were relief cutting tools. We were encouraged to cut designs into the blocks for impressing into the handmade paper during the pressing and drying processes.

A few more papers made in this class:


These and other techniques were all employed for the grande finale--a class-wide portfolio exchange. Each member of the class was given the creative freedom to make an edition of papers using any combination of the techniques that had been taught. For a celebration of the anniversary of Hand Papermaking, an exhibit of one of these portfolios was later displayed at the University of Wisconsin-Madison.

Throughout the class, Andrea Peterson (hookpotterypaper.com) was on hand for management of the studio space and work flow among the students - necessary because our class was highly prolific, churning out collections of paper that kept Andrea busy, and kept the dryer full for the duration of the class. Our collections overflowed the show-and-tell table at the end of the week!

Monday, August 20, 2012

Guest Blogger Erin Sweeney, In Emulation of Books

Erin Sweeney is an artist living and working in New Hampshire. Her current work combines fibers, text, and the book form. She is interested in all forms of building, be it conceptual or physical. Making handmade objects, manipulating space, and utilizing printmaking processes in non-traditional ways are all a part of Sweeney’s vocabulary. Be sure to visit her website: www.erinsweeney.net. I had the great fortune of meeting Erin at PBI this year and she graciously agreed to share a little report on one of her classes.

“Follow your instruction sheets!” Mindy Dubansky’s mantra to us during In Emulation of Books: The History of Objects in Book Form class at PBI this past May. I’m here to vouch for those instructions. I did this project again recently with the fine conservation department at Dartmouth College in Hanover, NH, and the instruction sheets were working quite well.

Jumping immediately into our Shaped Boxes, as it was imperative to have the first layers dry for the next day, there was no time for introductions or other bothersome chatting. Working from the inside of the box out, we started with marbled (or other decorative paper) and cut it to size, based on the size of our form. After wrapping our custom shaped length of 2’ x 4’ form (sanded on one side to imitate a book spine) with wax paper, we wrapped our marbled paper around, facing in. (The author struggled with paring paper edges, but that’s another story.) Next, we took strips of Bugra, made by Hahnemühle, and dampened and pasted these strips. We wrapped and wrapped our forms, slowly and carefully.

Erin's finished book-shaped container:


It was a mental mind-bender to understand we were working from the inside out, so the next steps needed to just be done and not over-analyzed—and we successfully planned where our lids would be, making jigs so we’d remember later. After adding spacer layers, more decorative paper to line the inside of the case, and the little gap that would let us know where to stop cutting later, we wrapped more Bugra around the form, for a total of 12 wraps.

After setting our forms in a hot room to dry more quickly overnight, the next morning we were ready to cut. We trimmed the tops and bottoms and cut the whole box down to that little gap that we left (gasp!), slid them off our forms, sanded, and got ready to make the tops and bottoms—very simple, it turns out, as we traced our tops and bottoms onto Museum board, cut them out, and then cut out two more small pieces to be glued on for insets. I was expecting a monumental feat of measuring with complicated tools, and was relieved to find that we were simply tracing!

Finishing these cases took the most time—and I discovered first-hand the delightful camouflaging qualities of marbled paper. More sanding, gluing on strips of leather on the spine to imitate bands, applying the leather spine over the bands, and finishing the outside and top and bottom of the case came next.

Several of the 'blooks' made in this class:


The highly finished look of this piece is marvelous, as is the delight in imagining all of the things you could wrap paper around to make your own shaped objects—when trying this again at Dartmouth, I made the Scroll Case instead of the Shaped Box. It is slightly easier to wrap, and less finicky to finish. We used heavy cardboard tubes instead of PVC pipe, and they worked well.

Mindy’s passion is “blooks”—book shaped objects and their history. Her personal collection and depth of knowledge is impressive and she was more than ready to share. Her slide show reflected well the depth and breadth of her knowledge. Additionally, Mindy’s extensive materials list, tool hints and tricks of the trade were most appreciated. Recently on the Book Arts listserv, she sent out instructions on how to make “A Successful Ball Point Water Pen, Recycled.” Perfect! She lists in succinct detail exactly how to do this. I want to make one just because she sent out the instructions, and I don’t even need a Successful Water Pen.